Mastering Basic Shoelace Tying: A Guide for Adults
Ever noticed how effortlessly kids seem to tie their shoelaces while adults often struggle? It’s not because they’re naturally better—but because learning this essential skill early sets the foundation for lifelong independence. In today’s fast-paced world, teaching basic shoelace tying to adults—whether for personal refreshment or to help others—is a simple yet powerful step toward boosting confidence and self-efficiency. Learning to tie shoelaces isn’t just about securing shoes; it’s a familiar movement deeply tied to motor skills, patience, and self-reliance. This guide is designed specifically for adults who may have never fully mastered this task—or wish to sharpen it. By breaking the process into clear, step-by-step actions, even complex techniques become approachable and achievable.Why Adults Still Benefit from Learning Shoelace Tying
Many assume shoelace tying is a childhood milestone no longer needed, but that’s a common misconception. For adults, relearning or practicing this skill offers unexpected benefits:- Restoring Independence: A reliable knot ensures shoes stay secure during busy days, reducing frustration when laces loosen unexpectedly.
- Improving Fine Motor Control: The precise hand movements strengthen coordination—valuable for all ages—especially for those managing motor challenges.
- Confidence Boost: Mastering a foundational task reinforces competency and reminds us we can learn new things at any stage.
- Practicality: Even with modern shoe designs, secure lacing remains key for boots, sneakers, and lace-up shoes where slip-resistant support matters.
Start by laying your shoe flat on a table, front side up, with laces extended evenly on either side. This visibility clarifies positioning and reduces confusion.
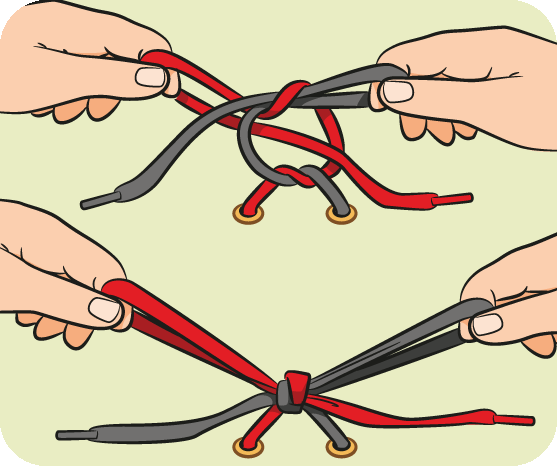
Step 1: Create the ‘X’ Lace Cross
As we can see from the illustration, Teaching Basic Shoelace Tying To Adults has many fascinating aspects to explore.
Cross the left lace over the right lace—forming an “X.” This foundational step helps align tension and prepares for tying.
Step 2: First Loop – The Cross-Lap
Take the left lace and pass it *under* the crossed right lace, then loop it **through** the opening between the right lace and the bottom of the shoe. Keep the knotting zone at the top of thelaces for better control.
Step 3: Second Loop – The Through Pass

Such details provide a deeper understanding and appreciation for Teaching Basic Shoelace Tying To Adults.
Now, bring the left lace up and pass it *through* the new opening created by the first loop, tightly wrapping around the right lace. Tighten slowly to avoid slack.
Step 4: Complete the Knot
Gently pull both loops inward, gently tightening the knot until both ends lie evenly. If needed, form a small loop at the base and tuck the tail under itself for durability.
Alternative Knot Styles to Keep It Engaging

- The Ian Knot: A faster, one-handed technique using a single loop wrap—great for speed and ease.
- Zipper Lacing: A decorative, secure method that interlaces laces like a zipper, ideal for those valuing style and stability.
- Loop & Pull: Ideal for one-handed instruction, where one lace acts as a guide and the other secures effortlessly.
")


 - wikiHow")

