Master the Art of Clear Instructions for Tying Shoes
Tying your shoes may seem simple, but mastering a reliable, secure knot can feel tricky—especially for beginners. Yet, with clear instructions for tying shoes, anyone can build confidence and consistency. In this guide, we break down proven techniques, visual-friendly tips, and practical hacks to help you tie your laces **with ease and perfection** every time.Why Clear Instructions for Tying Shoes Matters
Imagine lacing up your sneakers or boots and knowing exactly how to form a strong, neat bow—no guesswork, no frustration. That confidence comes only from mastering clear, step-by-step guidance. Whether teaching a child, adjusting technique for comfort, or perfecting speed, these instructions serve as your roadmap. Clear instructions reduce confusion, prevent loose knots, and keep your footwear snug—no slipping, no looseness, just secure, professional results. Not every shoe lacing style is the same—crossover laces, double knots, single or double bows: each has its purpose. A clear breakdown helps you find what works best for your activity. For everyday running shoes, a quick self-tie with a double knot works. For formal boots, a neat 4-in-one bow delivers elegance. Understanding these variations empowers you to choose, learn, and practice clearly—giving you flexibility in how you tie your shoes.Step-by-Step: Clear Instructions for Tying Shoelaces

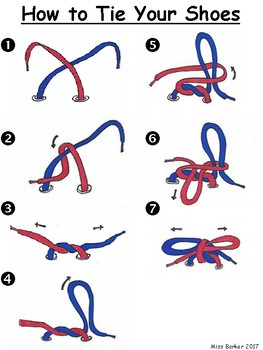
- Start with clean, untangled laces. Hold one side loosely in each hand, letting tension guide your tension as you begin.
- Cross the left lace over the right, forming an ‘X’ shape just above your foot. Ensure a balanced crossing—this is the foundation.
- Thread the looped right lace under itself, then loop it through the open space above, creating the first half of your bow.
- Now, take the left lace and pull through the tunnel beneath the bow—this forms the initial lock.
- To tighten, gently pull both loops outward while looping the right lace through the falling tail. Adjust until the knot lies flat and secure against the shoe.
Visual Clues That Reinforce the Technique

Tips for Tying Laces Securely and Smartly
Good shoelace tying isn’t just about looks—it’s about durability. Follow these clear tips for maximum security: - Use a **double knot** when stability is key—common in sports or formal footwear. - Adjust lace tightness periodically during tying to avoid weak knots. - For daily wear, a solid single loop tied tightly often suffices. - Ensure the bow rests evenly across the shoe’s tongue, preventing misalignment. - Keep laces smooth and untangled post-tie—minimal slack means better wear and slip resistance.Finding Your Perfect Shoelace-Tying Style
Teaching Kids the Basics with Confidence
Learning shoelacing is a milestone for children. Clear, visual instructions lead the way. Break the steps into tiny parts: “Cross, loop, pull, tighten.” Use logic: “Your bow needs to cross so it lies flat.” Pair each step with a simple phrase or prompt. Encourage by celebrating small wins—they thrive on seeing progress. With patience and clear guidance, they’ll master tying in no time.The Hidden Benefits Beyond Function
A neat lacing technique improves more than just shoes. It enhances:- Confidence—knowing you can tie well builds readiness for school or play.
- Safety—secure ties reduce slipping, sharpening daily awareness.
- Comfort—the right bow placement prevents rubbing or pressure spots. Clear instructions turn a basic act into a empowering skill with ripple effects across confidence, safety, and daily routine.


 - Instructables")
